Time Conditions in Yeastar S-Series VoIP IP PBX
What is the Time Conditions used for?
You may want to route business calls to different destinations during different time, like working hours, holidays or even lunch time. Time Conditions in S-Series PBX is the feature to achieve that. Time Conditions is used to control call flow based upon time and date. On Time Condition page, you can create time groups. A time group is a list of times against which incoming or outgoing calls are checked. The rules specify a time range, by the time, day of the week, day of the month, and month of the year. Time Conditions can be assigned to an inbound route, which control the destination of a call based on the time. The destination could be Voicemail, Queues, IVR, Inbound Routes, etc. Time Conditions can also be assigned to an outbound route in order to limit the use of that route.
For example, you might create a Time Condition called “Lunch.” You would then select a Time Group that defines what time periods are “lunch,” and then indicate that calls that come in during lunchtime should go directly to voicemail, while calls that do not come in at lunchtime should ring the Front Desk.
Appropriate Time Conditions can not only make your business arrangement more effective and reasonable, but also avoid the situation missing an important call or ringing the Front Desk but nobody answer to cause a loss to company.
How do I use the Time Conditions?
- Add Time Condition
Go to Settings>PBX>Call Control>Time Conditions, click ![]() to add time condition.
to add time condition.
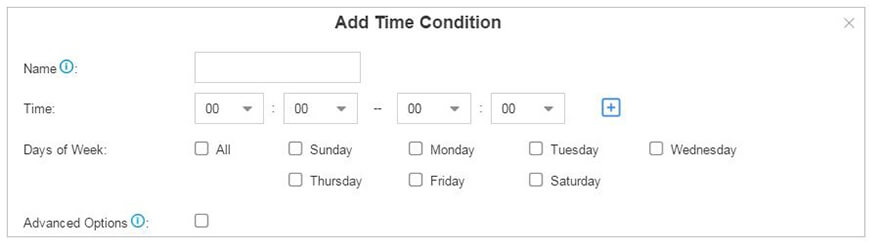
- Name: give this Time Condition a brief name to help you identify it.
- Time: this is where you will define a time range. You can define multiple ranges in the same time group by clicking
 .
. - Days of Week: select a week day, month day, and/or month range in which you want this time range to apply.
- Advanced Options: this option is disabled by default. If it is enabled, you need to set the month and the day of the month. If it is disabled, it means that the time range defined above will apply to every day of the month, every month of the year.
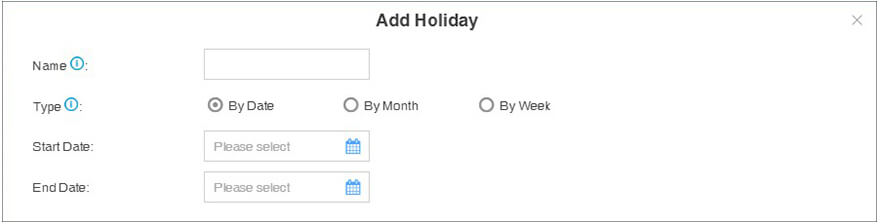
- Add a Holiday
After you have defined your office time conditions, you may need to create a holiday time groups. For example, you want to create a Holiday for New Year’s Day, from January 1st to January 3rd.
Click ![]() to add a holiday. You can set by specific dates, or a specific day of the week in a specific month through the different type.
to add a holiday. You can set by specific dates, or a specific day of the week in a specific month through the different type.
- Assigning Time Conditions to Inbound Routes
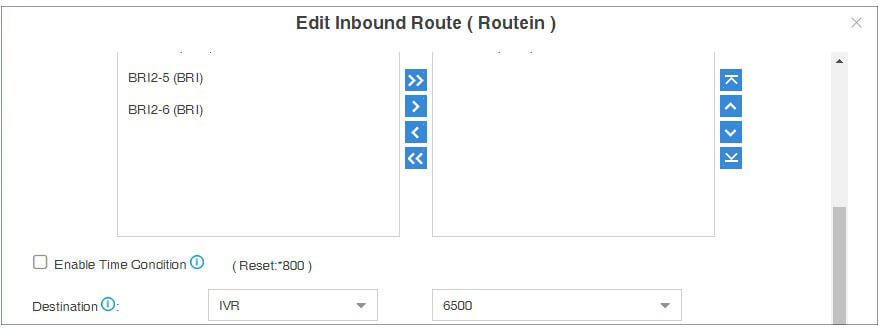
Path: Settings>PBX> Call Control>Inbound Routes, add a new route or edit the existing route.
The created Time Conditions will become available for selection in the Inbound Routes.
- If you disable the Time Conditions in inbound routes, all calls will be routed to the “Destination”.
- If enabled, you can route calls to different destinations at different times. Calls that do not match the time periods will be routed to Other Time destination.
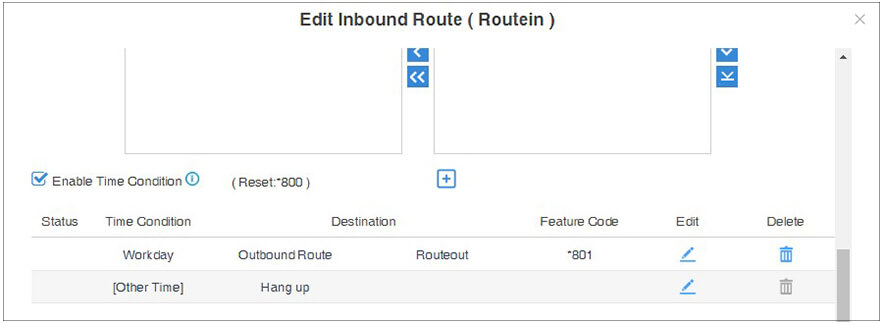
The system will assign each Time Condition with a feature code, so you can use this code to force change of destination of a Time Condition and restore to its original destination.
Tips: you can use the feature code to forced switch the Time Condition, in the case like that you need to use Holiday condition in workday. So you don’t need to add a new time condition. After that, you can also use the feature code to restore it to your original setting.
- Assigning Time Conditions to Outbound Routes
You can also assign Time Conditions to outbound routes, which may help you to control the route that can be used. For example, you can limit the users to make outbound calls when your office is closed.
Path: Settings>PBX> Call Control>Outbound Routes.
In the firmware version 30.3.0.10, we optimizes the Time Condition feature. Only permitted extensions can override the time condition. (Go to “Settings > PBX > General > Feature Code > Time Condition”, click “Set Extension Permission” to select the extensions.)